Motor Car History
Technical History of the Motor Car


1890s  1900s  1910s  1920s  1930s  1940s  1950s  1960s   1970s  1980s  1990s  2000s  2010s

Toggle Navigation
  • Home
  • Makes and models
  • Motor car History
  • Maintenance Guide
    • Engines By Make
    • Engine Components
    • Electrical & electronic
    • Gearbox & Drivetrain
    • Induction & Exhaust
    • Suspension Types
    • Tyres wheels Brakes
    • Vehicle Body types
  • Trivia
  • Register
  • *Top rated*
  • You are here:  
  • Motor Car
  • Maintenance Guide
  • Vehicle Body
  • Paint Cracking Problems
Technical Guides

Paint Cracking and shrinking Problems
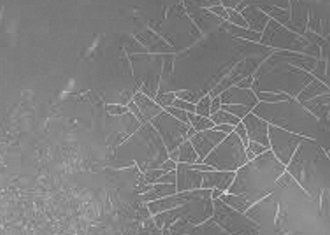
Paint Cracking Problems


This section includes shrinking and splitting (of undercoats). To repair Flat out cracked area, or wash off with proper thinner or solvent, and repaint.

Cause
1. Material not thoroughly stirred before use. If some of the undercoat has been previously used without stirring thoroughly, it may have upset the pigment to binder ratio to such an extent that the remaining material will always give trouble.
2. Surface not completely clean.
3. Insufficient flatting and feather-edging.
4. Oil or water in airline.
5. Insufficient thinning of undercoat.
6. Use of wrong or poor thinner.
7. Undercoat applied too heavily, especially first coat.
8. Blowing of air on wet film in attempt to speed up flash-off and drying.
9. Applying undercoat on a too hot or too cold surface.
10. Insufficient drying time allowed for between coats.
11. Use of too coarse a grade of wet and dry.

Prevention
1. Stir undercoat thoroughly each time before use.
2. Use wax and grease remover to clean surface before and after.
3. Flat well with the recommended grit paper. Feather-edge well back into old finish.
4. Keep airlines free of water and oil.
5. Thin undercoat fully with the proper good-quality thinner.
6. Apply undercoat in medium-thin coats, especially the first coat.
7. Avoid blowing air on wet undercoat.
8. Allow room, metal, and material to come to equal temperatures, preferably between 16 and 24 °c.
9. Allow each coat to dry thoroughly before applying succeeding coat.


Related items
vehicle body repair | Vehicle Paint
  • Vehicle Body Previous 44 / 111 Next

Body Types

  • Vehicle Body TypesVehicle Body Types
    • Berlinetta
    • Bullnose
    • Dicky seat
    • Gull wing
    • high wheelers
    • Landaulet
    • Shooting Brake
    • Spider
    • superleggera
    • Targa
    • Torpedo
    • Tricar
    • Vignale

On Motor Car

  • Maintenance Guide
  • Makes and Models
  • Motor car History
  • Film & TV
  • Your Top Rated *****
  • Join here

log on

Log in to Motor car

  • Forgot your username?
  • Forgot your password?

Welcome To Motor Car

  • cyclecar
  • Northamptonshire UK
  • Convertible
  • War Time
  • campervan
  • limousines
  • prototype
  • coupe
  • British Concept Cars
  • Coach-Bus
  • British Sports cars
  • Steam Cars
  • British Commercial vehicles
  • Driving techniques
  • vehicle body parts
  • Service related
  • Vehicle Paint
  • vehicle body repair
  • Technical terms
  • welding

Help Guide

  • Engine
    • Manufacturers
    • Components
    • Cooling System
    • Cylinder
    • Fuel system
    • Ignition System
    • Starter motor
    • Turbo
    • Crankshaft
    • Piston
    • ECU related
    • Injection
  • Carburettor
    • Holley
    • Solex
    • SU
    • Weber
    • Zenith
    • Stromberg
  • Drivetrain
    • Clutch
    • Gearbox
    • Tyres
    • Wheels
    • Driving techniques
  • Suspension
  • Electrical
  • Vehicle Body
  • Brakes
  • Service Guides
  • Tools

Please help to keep this site active.

Enjoy all of Motor Car Here


Back to Top

© 2025 Motor Car History