Motor Car History
Technical History of the Motor Car


1890s  1900s  1910s  1920s  1930s  1940s  1950s  1960s   1970s  1980s  1990s  2000s  2010s

Toggle Navigation
  • Home
  • Makes and models
  • Motor car History
  • Maintenance Guide
    • Engines By Make
    • Engine Components
    • Electrical & electronic
    • Gearbox & Drivetrain
    • Induction & Exhaust
    • Suspension Types
    • Tyres wheels Brakes
    • Vehicle Body types
  • Trivia
  • Register
  • *Top rated*
  • You are here:  
  • Motor Car
  • Maintenance Guide
  • Vehicle Body
  • Paint Crazing Problems
Technical Guides

Paint Crazing Problems

Paint Crazing Problems


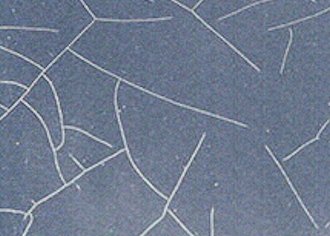
This section includes alligatoring, crow-footing and hair-lining (of colour coats).

To RepairThoroughly remove entire crazed finish and repaint. Good-quality modern finishes properly applied rarely, if ever, fail by crazing. The  film defects, all related, and named to describe their appearance, are generally the result of the following:

Cause

1 .Application of new finish over an old finish which has already crazed.The crazing in the old finish may not have been visible without close inspection using a magnifying glass.
2 .Use of poor-quality, too brittle finishes.
3 .Application of new finish over an old finish of new undercoat which is too soft.
4 .Application of new finish over undercoats which are too thick or not thoroughly dried.
5 .Application of excessively thick finish coats.
6 .Mixing of unproven additives, such as gloss improvers, with the colour coat.
7 .Insufficient stirring of materials to incorporate all the pigments.
8 .Use of shellac sealers.
9 .Use of poor quality or improper thinner.


Prevention
1 .Always use highest-quality materials; they are much cheaper in the long run.
2 .Inspect the old finish carefully with a magnifier. If old finish shows any signs of crazing, remove completely before re-finishing.
3 .Apply undercoats in medium-thin coats, allowing plenty of drying time for each coat.
4 .Do not use too much material.
5 .If the job has previously been repainted, flat down thoroughly to reduce total film thick-ness.
6 .Do not add anything to refinishing materials not specifically recommended by the manufacturer; then follow directions carefully.
7 .Stir all materials thoroughly each time before use. Thinned materials settle more rapidly, so be sure to agitate material in spray cup occasionally during use.
8 .Always use good and correct thinner, as well as a sufficient amount.

Related items
vehicle body repair | Vehicle Paint
  • Vehicle Body Previous 45 / 111 Next

Body Types

  • Vehicle Body TypesVehicle Body Types
    • Berlinetta
    • Bullnose
    • Dicky seat
    • Gull wing
    • high wheelers
    • Landaulet
    • Shooting Brake
    • Spider
    • superleggera
    • Targa
    • Torpedo
    • Tricar
    • Vignale

On Motor Car

  • Maintenance Guide
  • Makes and Models
  • Motor car History
  • Film & TV
  • Your Top Rated *****
  • Join here

log on

Log in to Motor car

  • Forgot your username?
  • Forgot your password?

Welcome To Motor Car

  • cyclecar
  • Newcastle-on-Tyne UK
  • Convertible
  • campervan
  • limousines
  • Micro car
  • Roadster
  • British Concept Cars
  • Coach-Bus
  • British Sports cars
  • Steam Cars
  • Electric cars 1890s
  • Driving techniques
  • Britain 1970s
  • vehicle body parts
  • Service related
  • Vehicle Paint
  • vehicle body repair
  • Technical terms
  • welding

Help Guide

  • Engine
    • Manufacturers
    • Components
    • Cooling System
    • Cylinder
    • Fuel system
    • Ignition System
    • Starter motor
    • Turbo
    • Crankshaft
    • Piston
    • ECU related
    • Injection
  • Carburettor
    • Holley
    • Solex
    • SU
    • Weber
    • Zenith
    • Stromberg
  • Drivetrain
    • Clutch
    • Gearbox
    • Tyres
    • Wheels
    • Driving techniques
  • Suspension
  • Electrical
  • Vehicle Body
  • Brakes
  • Service Guides
  • Tools

Please help to keep this site active.

Enjoy all of Motor Car Here


Back to Top

© 2025 Motor Car History